Pi-hole Setup Guide
Block Ads & Protect Privacy Network-Wide

Learn how to install and configure Pi-hole to block ads on every device in your home, stop smart TVs from tracking you, and take control of your network's privacy. This complete guide walks you through everything step-by-step.

Start Installation Guide
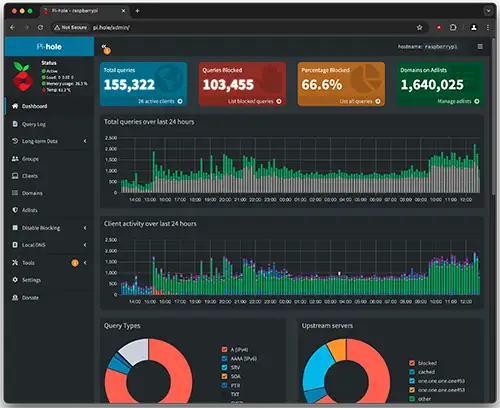
Pi-hole Dashboard Interface

What is Pi-hole and Why You Need It

Pi-hole is a network-wide ad blocker that acts as a DNS sinkhole. Instead of installing ad blockers on every device, Pi-hole blocks ads at the network level, protecting all your devices at once - including those that can't install traditional ad blockers like smart TVs, IoT devices, and gaming consoles.

Key Benefits You'll Get:

  • Block ads on ALL devices - including smart TVs, phones, tablets, and computers
  • Stop tracking - prevent Google, Facebook, and others from following you
  • Faster internet - save 15-40% bandwidth by not loading ads
  • Block smart device spying - stop TVs and IoT devices from phoning home
  • Protect against malware - block known malicious domains automatically

Learn more about Pi-hole's features and community at pi-hole.net | Official Documentation | Community Forums

How It Works

When any device on your network tries to load an ad or tracker, it asks Pi-hole for the IP address. Pi-hole checks if it's on the blocklist and returns a blank response, preventing the ad from loading.

What Gets Blocked

Ads on websites, in-app ads, YouTube ads (partially), tracking pixels, analytics scripts, malware domains, crypto mining scripts, and telemetry from smart devices.

Compatible Devices

Works with every device on your network: Windows, Mac, Linux, iOS, Android, Smart TVs, Roku, gaming consoles, IoT devices, and anything else that connects to your network.

Quick Start: Choose Your Installation Method

Option 1: Raspberry Pi

The most popular method - dedicated hardware that runs 24/7

  • Works with any Raspberry Pi model
  • Low power consumption (~$5/year)
  • Set and forget solution
  • Can run other services too
  • Cost: ~$35-75 for hardware
→ Install on Raspberry Pi

Option 2: Docker Container

Perfect if you already have a home server or NAS

  • Runs on existing hardware
  • Easy to update and maintain
  • Isolated from host system
  • Works on Synology, QNAP, etc.
  • Cost: Free (uses existing hardware)
→ Install with Docker

Option 3: Virtual Machine

Good for testing or if you have a always-on PC
  • Run on Windows/Mac/Linux
  • Great for trying Pi-hole first
  • Uses VirtualBox or VMware
  • Easy to remove if needed
  • Cost: Free (uses your PC)
→ Install on VM

Installing Pi-hole on Raspberry Pi

What You'll Need:

  • • Raspberry Pi (any model - even Pi Zero works)
  • • MicroSD card (8GB minimum)
  • • Power supply for your Pi
  • • Ethernet cable (recommended) or WiFi
  • • 30 minutes of time
Pi-hole Running on Raspberry Pi

Step 1: Install Raspberry Pi OS

  1. Download Raspberry Pi Imager
    Go to raspberrypi.com/software and download the imager for your computer.
  2. Flash the OS
    Insert your MicroSD card, open the imager, select "Raspberry Pi OS Lite (32-bit)" and click Write.
  3. Enable SSH (Optional but recommended)
    After flashing, create an empty file named ssh (no extension) in the boot partition.
  4. Boot Your Pi
    Insert the SD card, connect ethernet (or configure WiFi), and power on. Wait 2-3 minutes for first boot.

Step 2: Connect to Your Pi

Find your Pi's IP address by checking your router's device list, or use:

ping raspberrypi.local

Connect via SSH (use Terminal on Mac/Linux or PuTTY on Windows):

ssh pi@YOUR_PI_IP_ADDRESS

Default password: raspberry

Step 3: Install Pi-hole

First, update your system:

sudo apt update && sudo apt upgrade -y

Run the official Pi-hole installer (from pi-hole.net):

curl -sSL https://install.pi-hole.net | bash

Installation Wizard Settings:

  • Upstream DNS: Choose Cloudflare (1.1.1.1) or Quad9 for privacy
  • Blocklists: Keep the default (you can add more later)
  • Protocols: Select both IPv4 and IPv6
  • Static IP: Yes (the installer will set this up)
  • Web Interface: Yes (to access the dashboard)
  • Log Queries: Yes (you can disable later for privacy)

Save your admin password! It will be shown at the end of installation.

Installing Pi-hole with Docker

Docker Compose Method (Recommended)

Create a new directory and add this docker-compose.yml file (official image from Docker Hub):

version: "3"
services:
  pihole:
    container_name: pihole
    image: pihole/pihole:latest
    ports:
      - "53:53/tcp"
      - "53:53/udp"
      - "80:80/tcp"
    environment:
      TZ: 'America/New_York'  # Change to your timezone
      WEBPASSWORD: 'your-secure-password-here'
    volumes:
      - './etc-pihole:/etc/pihole'
      - './etc-dnsmasq.d:/etc/dnsmasq.d'
    cap_add:
      - NET_ADMIN
    restart: unless-stopped

Then run:

docker-compose up -d

Alternative: Docker Run Command

docker run -d \
  --name pihole \
  -p 53:53/tcp -p 53:53/udp \
  -p 80:80 \
  -e TZ="America/New_York" \
  -e WEBPASSWORD="your-secure-password-here" \
  -v "${PWD}/etc-pihole:/etc/pihole" \
  -v "${PWD}/etc-dnsmasq.d:/etc/dnsmasq.d" \
  --cap-add=NET_ADMIN \
  --restart=unless-stopped \
  pihole/pihole:latest

Note: If port 80 is in use, change it to -p 8080:80 and access the web interface at http://YOUR_IP:8080/admin

Configuring Your Network to Use Pi-hole

Method 1: Configure Your Router (Recommended)

This method automatically protects ALL devices on your network:

  1. Log into your router's admin panel (usually 192.168.1.1 or 192.168.0.1)
  2. Find DHCP or DNS settings (location varies by router)
  3. Set Primary DNS to your Pi-hole's IP address
  4. Set Secondary DNS to a backup like 1.1.1.1 (or leave blank)
  5. Save and reboot your router

Pro Tip: Some routers call this "LAN DNS" or "DHCP DNS". Look in Network, LAN, or DHCP sections.

Method 2: Configure Individual Devices

Windows 10/11:

  1. Settings → Network & Internet → Change adapter options
  2. Right-click your connection → Properties
  3. Select Internet Protocol Version 4 → Properties
  4. Use these DNS servers: Enter Pi-hole IP

iPhone/iPad:

  1. Settings → Wi-Fi → Tap the (i) next to your network
  2. Configure DNS → Manual
  3. Delete existing servers, add Pi-hole IP

Android:

  1. Settings → Network & Internet → Private DNS
  2. Or: WiFi settings → Modify network → Advanced → Static IP → DNS

Using Pi-hole: Dashboard & Settings

Accessing the Dashboard

Open your browser and go to:

http://YOUR_PI_HOLE_IP/admin

Log in with the password from installation. You'll see real-time stats showing blocked queries, top domains, and client activity.
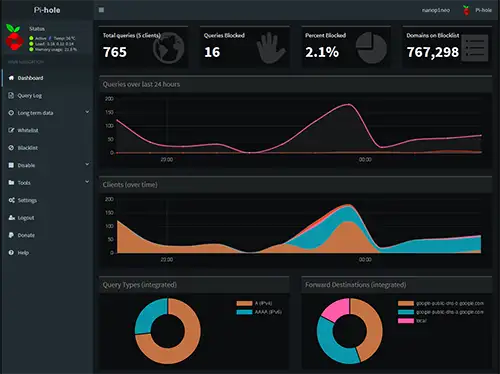
Quick Stats to Check:

  • Queries Blocked: Should be 10-30% typically
  • Domains on Blocklist: 100,000+ is normal
  • Clients: All your network devices
Pi-hole Dashboard Statistics

Essential Blocklists to Add

Go to Group Management → Adlists and add these:

  • OISD: Comprehensive ad & tracker blocking
    https://big.oisd.nl/
  • Smart TV blocklist: Stop TV tracking
    https://perflyst.github.io/PiHoleBlocklist/SmartTV.txt
  • NoTrack Malware: Security protection
    https://gitlab.com/quidsup/notrack-blocklists/raw/master/notrack-malware.txt

After adding, go to Tools → Update Gravity to activate.

Whitelisting Important Sites

Sometimes legitimate sites break. Common whitelists needed:

  • Microsoft/Windows Update:
    windowsupdate.microsoft.com
  • Banking apps: Check Query Log when apps fail
  • Smart home devices: May need manufacturer domains
  • Click tracking: Some email links need unblocking

Go to Whitelist → Add domain when needed.

Blocking Specific Devices

Stop smart devices from phoning home:

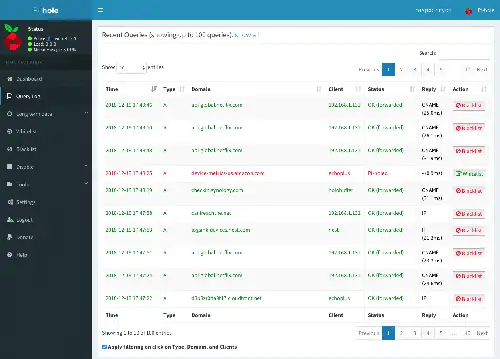
  1. Go to Query Log
  2. Find requests from your smart TV/device
  3. Look for domains like:
    samsung.com, vizio.com, roku.com
  4. Click the block button next to telemetry domains
  5. Or use regex to block patterns:
    .*\.samsung\.com$

Advanced Tips & Troubleshooting

Performance Optimization

  • Use unbound: Install a recursive DNS server for more privacy
  • Conditional forwarding: Speed up local hostname resolution
  • Increase cache size: Reduce external DNS queries
  • Disable query logging: After setup for better performance

Common Issues & Fixes

  • Sites not loading: Check Query Log, whitelist if needed
  • YouTube ads still showing: YT serves ads from same servers as videos
  • Slow DNS: Change upstream DNS or use unbound
  • Pi-hole not blocking: Ensure devices are using Pi-hole DNS

Monitoring & Maintenance

  • Update Pi-hole: pihole -up monthly
  • Update blocklists: pihole -g weekly
  • Check logs: pihole -t to see live queries
  • Backup settings: Settings → Teleporter for easy restore
  • Get help: Official docs & forums

Privacy Enhancements

  • Use DNS-over-HTTPS: Encrypt DNS queries
  • VPN + Pi-hole: Use Pi-hole when away from home
  • Anonymous mode: Don't log client IPs
  • Scheduled blocking: Different rules for work hours

Blocking Smart TV & IoT Device Tracking

Smart TVs and IoT devices constantly send data back to manufacturers. Here's how to stop them while keeping functionality intact.

Smart TV Domains to Block

Samsung TVs:

ads.samsung.com
samsungads.com
samsung-com.112.2o7.net
analytics.samsungknox.com

LG TVs:

ibs.lgappstv.com
lgad.cjpowercast.com
smartclip.net
smartshare.lgtvsdp.com

Roku:

logs.roku.com
giga.logs.roku.com
cooper.logs.roku.com

Amazon Fire TV:

amazonadsi-a.akamaihd.net
device-metrics-us.amazon.com
mads.amazon-adsystem.com

Warning: Test after blocking! Some smart TV features may stop working. Whitelist specific domains if apps break.

Creating Custom Block Rules

Use regex patterns to block entire tracking infrastructures:

# Block all Samsung telemetry
^(.+\.)?samsung\.com$
^(.+\.)?samsungelectronics\.com$

# Block Alexa/Echo tracking
^(.+\.)?amazon-adsystem\.com$
^(.+\.)?alexametrics\.com$

# Block Google Home tracking  
^(.+\.)?googleadservices\.com$
^(.+\.)?google-analytics\.com$

Add these in Pi-hole → Blacklist → RegEx filter

What to Expect After Setting Up Pi-hole

📊

30-40% Fewer DNS Queries

Typical home networks see massive reduction in unnecessary traffic

Faster Page Loads

Sites load 20-50% faster without ad servers and trackers

🛡️

Enhanced Privacy

Thousands of tracking attempts blocked daily from all devices

💰

Lower Data Usage

Save bandwidth and money, especially on metered connections

Ready to take control of your network's privacy and block ads everywhere?

Start Your Pi-hole Setup Visit Official Pi-hole Site